Replacing your cabinet doors and drawer fronts can be an easy way to give your kitchen or bathroom an updated look at minimal cost and without the hassle of removing all of your existing cabinets.
Cabinet replacement components are available in a variety of styles, so whether you’re looking to replace your doors, drawer fronts, or both, it’s usually possible to find something that fits your style and home décor.
If you want to learn how to replace cabinet doors and drawer fronts yourself, this quick and easy guide will show you exactly how to do it with very little effort or money required.
You’ll get expert advice on making your job easier as well as tips that will make replacing cabinet doors and drawer fronts more affordable than you thought possible!
A Quick and Easy Guide to Replacing Cabinet Doors and Drawer Fronts
This guide will show you exactly how to do that quickly and easily so you can breathe new life into your kitchen without needing to do any major construction work on your home.
Step 1: Plan ahead
To get a clear picture of what your kitchen will look like once you’ve replaced all of your old doors, you need to first plan everything out.
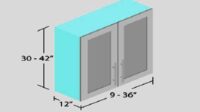
Take some measurements so that you know exactly how big each door is going to be. Write down all of your measurements; it’ll come in handy when ordering replacement parts.
Once you have them, think about what else you might want as part of your new kitchen cabinet; if you’re replacing your cabinet doors or drawer fronts, order some extra hardware too!
Step 2: Remove the old doors
Grab a screwdriver and start removing any hinges holding on your old cabinet doors. After that, remove any screws connecting your drawers or doors.
Be sure to pull gently if there’s glass in your door so you don’t risk breaking it. It is okay if some of these screws are stripped because you can replace them with new ones after reinstalling new hardware on your replacement drawer fronts or cabinet doors.
Once everything is off, wipe down all surfaces with a damp rag, not forgetting underneath doors where crumbs like to hide. You should be ready for installation now!
Step 3: Measure your cabinets
After you’ve removed your cabinet doors, take a few moments to measure them. If your drawers are narrow or don’t have a lot of storage space, replacing drawer fronts will also help make them more functional.
Measure inside edge-to-edge, top-to-bottom (not outside edge-to-edge) to find out how wide each door or drawer front is. The measurement will be used in step 4.
For example: if your cabinet doors are 25 inches wide by 20 inches tall, write that down for future reference.
Measure any separate pieces if applicable (e.g., drawers), too; these measurements should also include their thickness as well as their width and height.
Step 4: Cut new door panel boards
Now that you’ve located a replacement door or drawer front, it’s time to cut down your new door panel board.
For full overlay doors, use your router with a straight bit to chamfer all four edges of your new door panel board.
This will allow any protruding wood in your old cabinet door or drawer front fit behind your new overlay panel.
If you’re installing an inset cabinet door on top of an existing cabinet face frame (for example, if you have pocket holes in the frame), then start by cutting off those protruding pieces first, before cutting your new panel board to size.
Step 5: Attach the new door panels
Find an appropriate location for your replacement drawer front, mark your holes with a pencil, then pre-drill them.
(Don’t skip on pre-drilling you may crack your wood if you don’t.) Once your holes are pre-drilled, carefully start screwing in your drawer handles. If everything is aligned properly and there are no issues with shoddy craftsmanship, these should go in without issue.
Once everything is secure, take a look at how it looks! Are all of your drawers installed now? Awesome!
Step 6: Install your drawers front
Once you’ve attached your new drawer face, it’s time to put things in motion. Place your new drawer front on your cabinet door and add self-stick felt pads under each corner of the drawer front so that when you open and close it, it won’t scratch up your new finish.
(For added protection, you can use a couple of lengths of painter’s tape or even old scraps of fabric.) Next, take a hammer or other mallet-like object (like one of those decorative tacks) and tap gently along all four sides until they slip into place.
It may take some finagling but don’t force anything. It will be worth it when you see how great they look!


